Table of Contents
Introduction to Git Workflows for Seamless Development and Collaboration
Have you wondered how git workflows work in an enterprise? Making Development building and deployment easier while collaborating with others simultaneously.
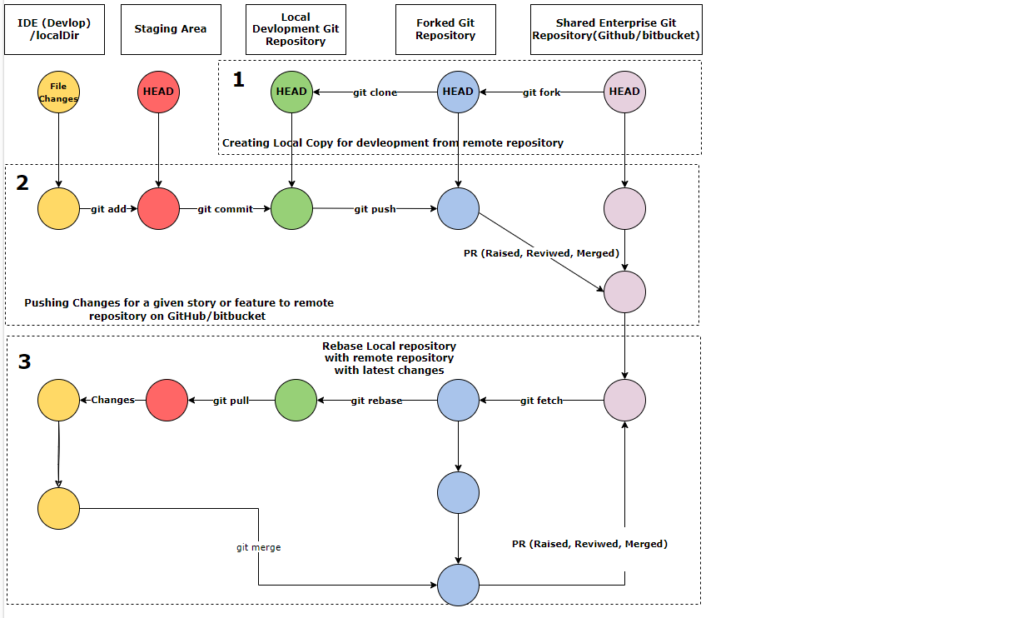
There are three parts to this continuous development cycle.
1. Setting Up Your Local Development Environment from a Remote Repository
- Forking the Repository
Firstly to start development you should have the local copy of the already created remote repository.
In Section 1 of the diagram first, you need to Git Fork(Personal repository of the remote repository on the server). (Section 1 pink circle from left) . - Cloning the Repository to Your Local Machine
Once you have the remote repository’s copy available, the next step is to clone the content for local IDE development via Git Clone(Creating a local directory with tracking changes for different branches). (Section 1 blue circle from left). - Preparing for Development
After having local changes via git clone, changes are set to the head of the cloned branch. Once you start active development, all the code will move to a staging area before moving into the IDE.
After having local changes via git clone, changes are set to the head of the cloned branch. Once you start active development, all the code will move to a staging area before moving into the IDE.
Any changes done as part of the development will be available and added to the staging area (Section 1 Red circle).
As a part of this git workflow now you have fetched code from the enterprise repository into your local to work upon.
Publishing Changes Back to the Remote Repository
- Adding Changes to the Staging Area
Once Feature changes are done in your IDE it’s time to add them back into the staging area via Git Add(adding files from the working directory to the staging area and preparing for a commit) - Committing Changes to the Local Repository
After files are added to the staging area, the current snapshot can be committed to the local repository via Git Commit(Create a new commit with the changes and prepare for a push) - Pushing Changes to the Forked Repository
Now changes are committed to the local repository, and they can be pushed into the forked repository via Git Push(Updates the forked repositories with the changes from the local repository) - Merging Changes with the Enterprise Repository
Finally, all the changes should be merged into the Enterprise git repo to build the project.
This will be done via raising a PR(We will discuss the process of PR creation in another article) and once the PR is raised it will be reviewed & Merged
As a part of this git workflow, you have developed and merged your changes into the remote git repository.
Continuous Development Cycle: Keeping Your Fork Updated
Now in the above 2 git workflows, we have learned about the first cycle of fetching the code from the remote repository and merging back your changes into the repository after active development.
But this is not a one-time activity and every time whenever you join a team, there are already people working on the same codebases, so you need to be mindful of how other people change.
- Fetching the Latest Changes from the Remote Repository
Firstly you need to fetch the latest changes from the remote repository from Git Fetch(Fetch the changes from remote branches by comparing your local changes). - Rebasing Local Changes
Then you need to update your working directory by rebasing your changes with the changes received by doing Git Rebase (save local changes in a temporary area and apply the latest changes from the remote repository) - Active Development and Merging Changes
Now we can start our active development and use git workflow 1 and 2 to merge our changes again via a PR.
Conclusion: Git Workflows for Efficient Continuous Development
Git Workflows helps your continuous development cycle by synchronizing your changes and teams changes with you.
Appendix
https://docs.github.com/en/get-started/using-github/github-flow
Leave a Reply to Git Commands (12 basic Commands) – The Devops Guy Cancel reply